Genesys Integration
Creating OAuth
Step 1: Log into your Genesys Account
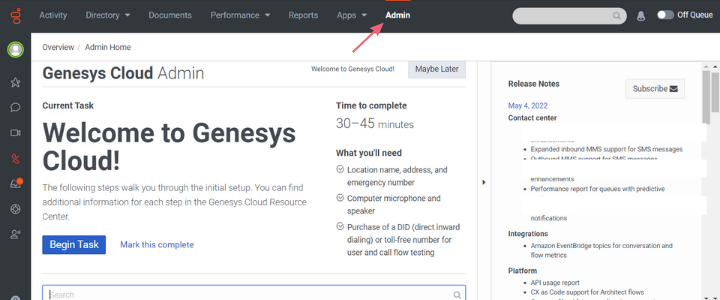
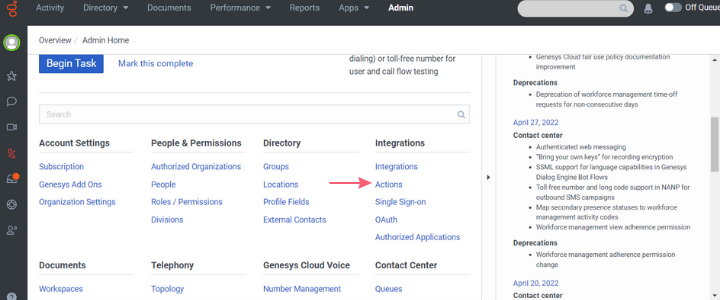
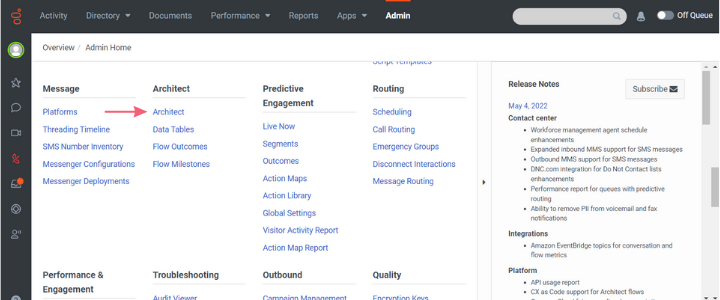
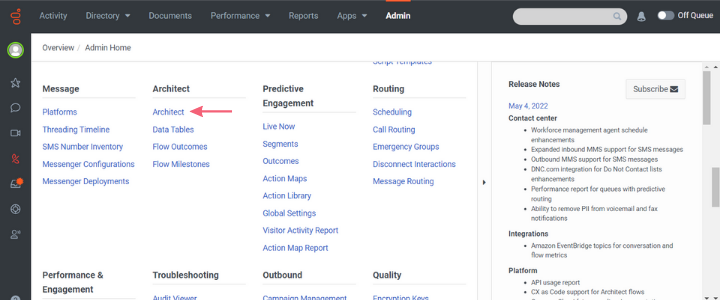
Step 2: Go to Admin
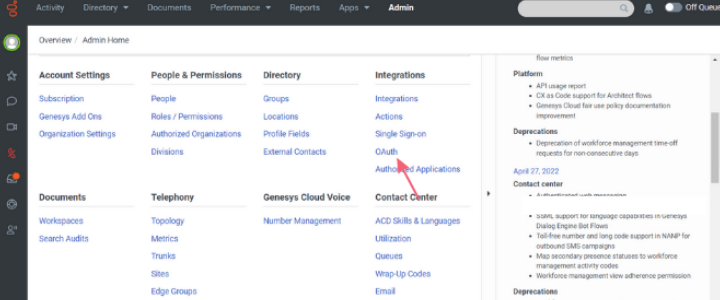
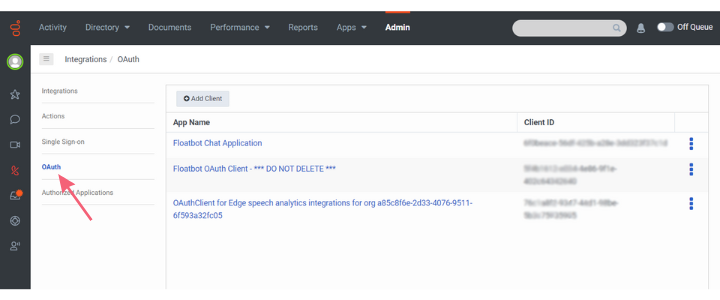
Step 3: Select OAuth from the Integrations/OAuth panel
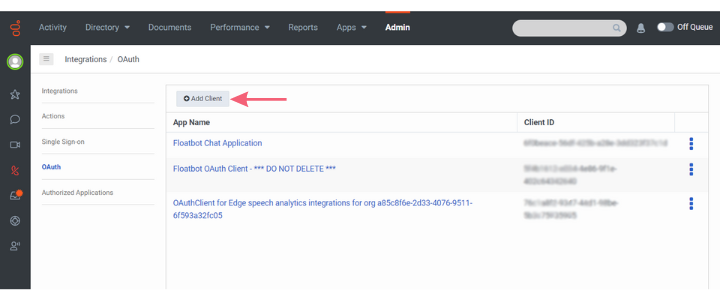
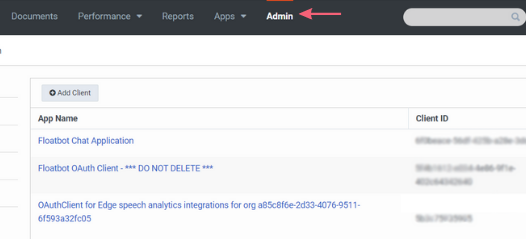
Step 4: Click on Add Client
Step 5: Put the following information in the input fields in the Client Details tab
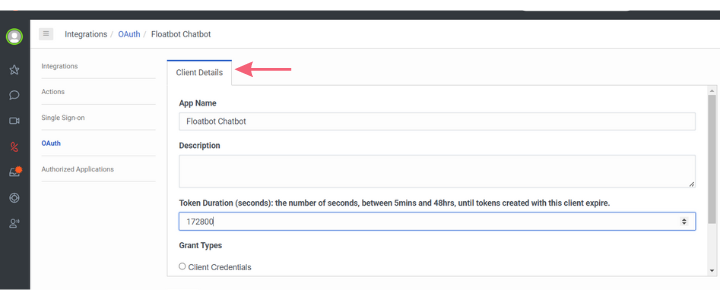
Name: Choose a name of your choice, e.g., Floatbot Chatbot
Description: Give a meaningful description of your choice
Token Duration: 172800
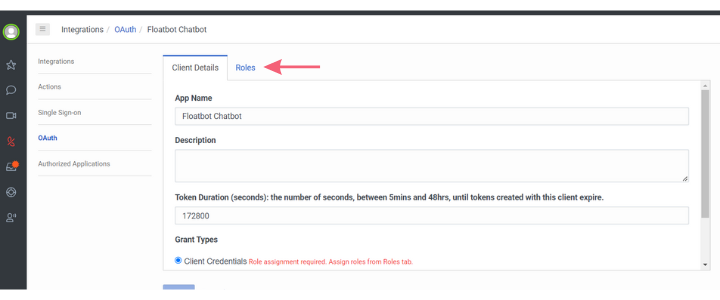
Grant Types: Select the Client Credentials button from the option
Step 6: Once you select Client Credentials, a new tab Roles will appear next to the Client Details tab
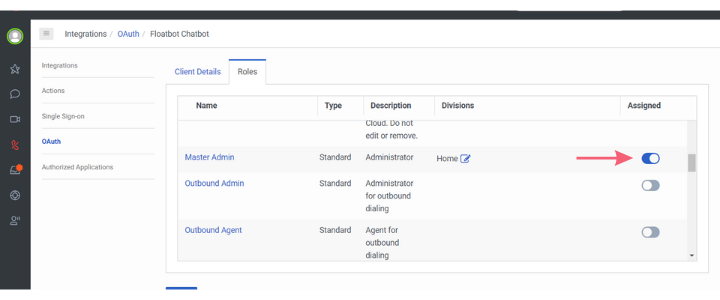
Step 7: Click on the Roles tab and assign yourself the Master Admin role
Step 8: Click on the Save button below the tabs
Once you click on the Save button, Client ID and Client Secret will appear in the Client Details tab
Creating Platform
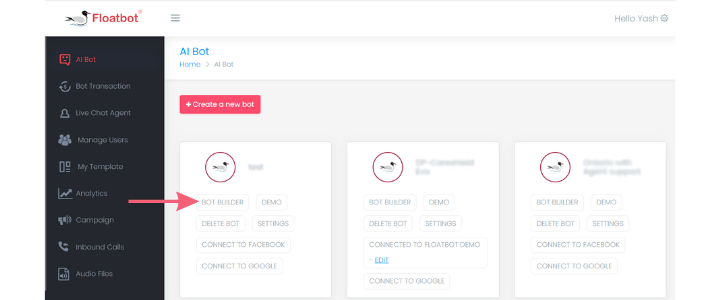
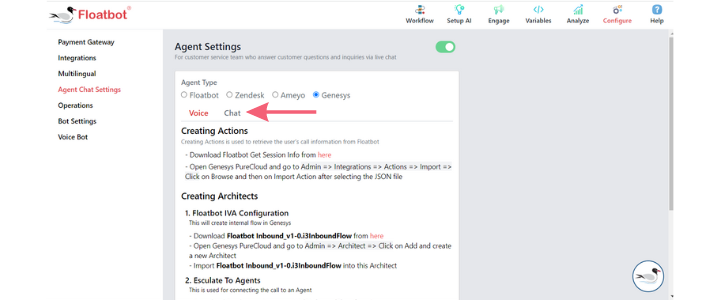
Step 1: Log in to Floatbot Account
Step 2: Click on the Bot Builder of your bot
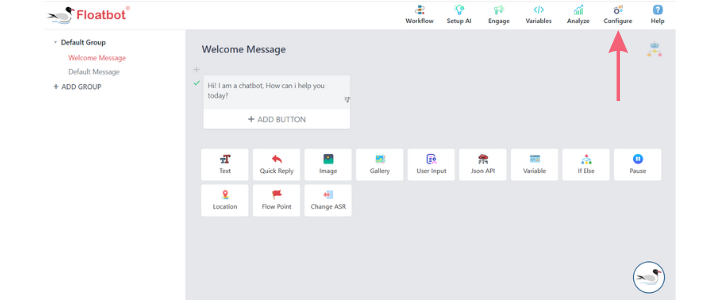
Step3: Click on the Configure option
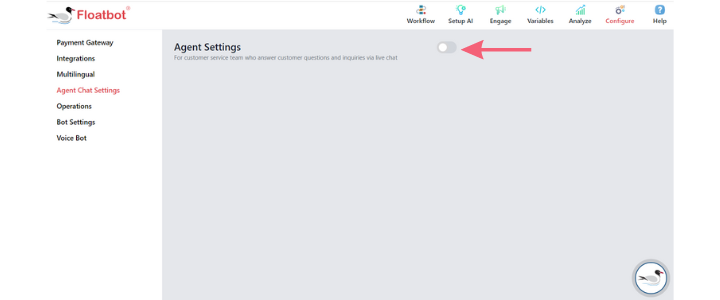
Step 4: Click on the Agent Chat Settings option

Step 5: Click on the Agent Settings
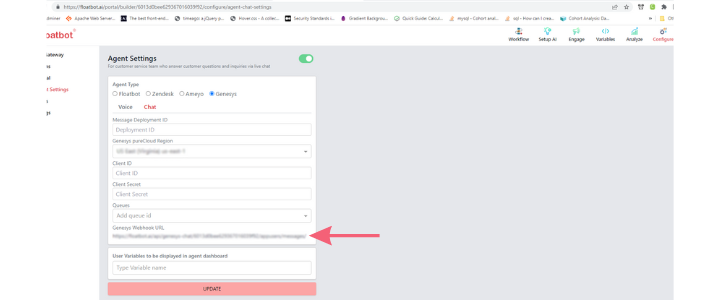
Step 6: Select Genesys from the Agent Type panel
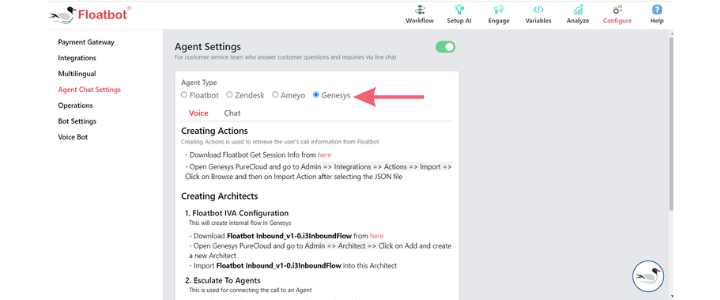
Step 7: Click on Chat
Step 8: Fill in the details
Message Deployment ID:
Genesys PureCloud Region:
Client ID:
Client Secret:
Queues: Depending on your Genesys integration, you can mention your queue ids.
Floatbot will subscribe to those queues for receiving events related to agents
Step 9: Copy Genesys Webhook URL and Webhook Signature Secret Token
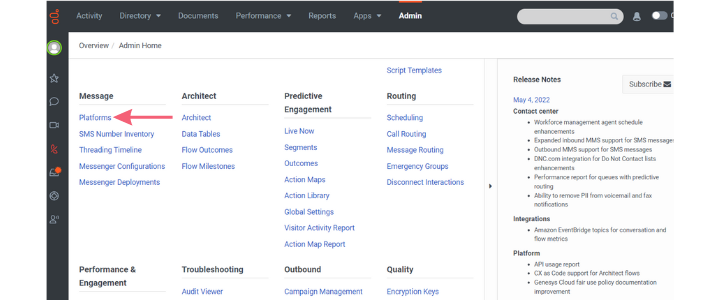
Step 10: Go to your Genesys Account
Step 11: Go to Admin
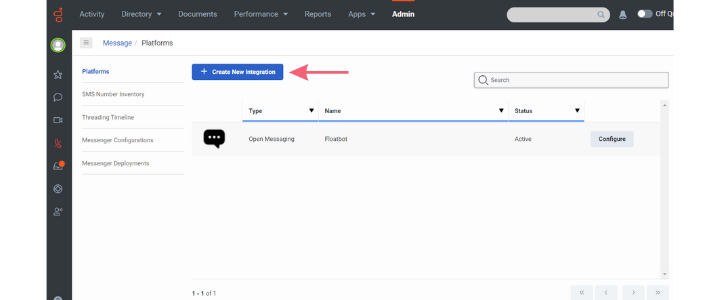
Step 12: Select Platforms from the Message panel
Step 13: Click on Create New Integration
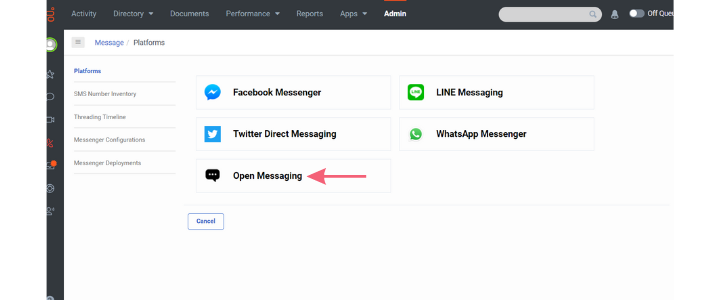
Step 14: Click on Open Messaging
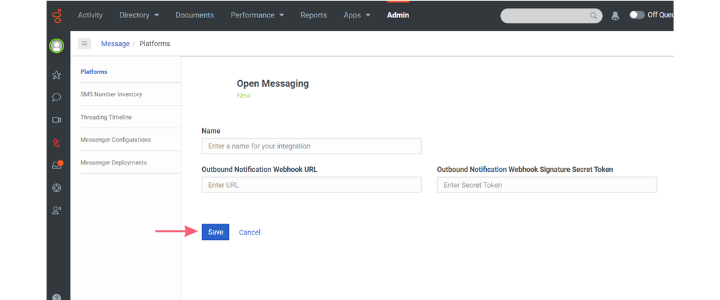
Step 15: Fill up the input fields
Name:
Outbound Notification Webhook URL:
Outbound Notification Webhook Signature Secret Token:

Step 16: Click on the Save button
Creating Actions
Step 1: You can download the Ready-to-test API file from <here>
Step 2: Log in to Genesys PureCloud
Step 3: Go to Admin
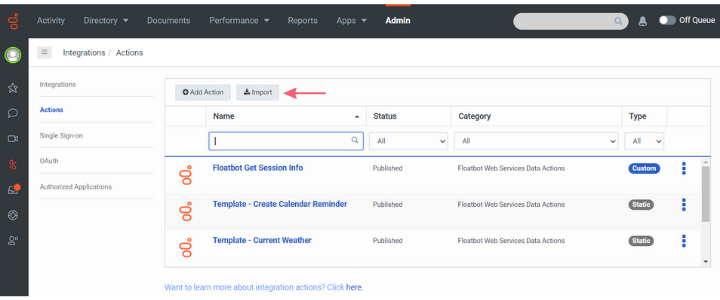
Step 4: Click on Actions from the Integrations panel
Step 5: Click on Import
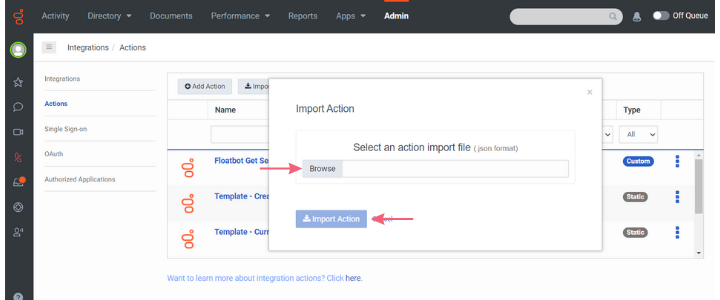
Step 6: Click on Browse and then on Import Action after selecting the JSON file
Creating Architects
Floatbot IVA Configuration
Step 1: Download Floatbot Inbound_v1-0.i3InboundFlow from <here>
Step 2: Open Genesys PureCloud and go to Admin
Step 3: Select the Architect option from the Architect panel
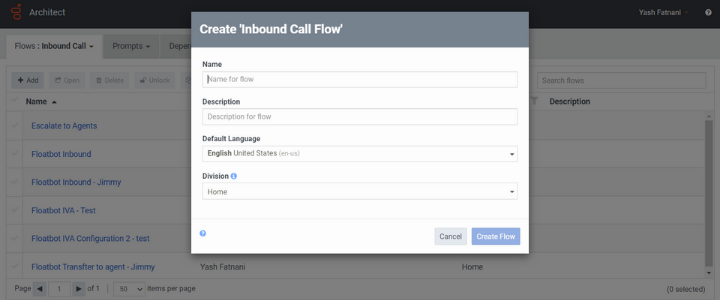
Step 4: Click on Add and create a new Architect
Step 5: Fill out the details in the Create ‘Inbound Call Flow’ tab
Name:
Description:
Default Language:
Division:
Step 6: Click on the Flow Options dropdown
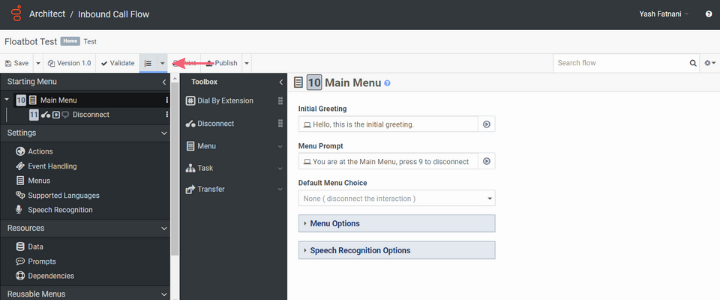
Step 7: Click on Import
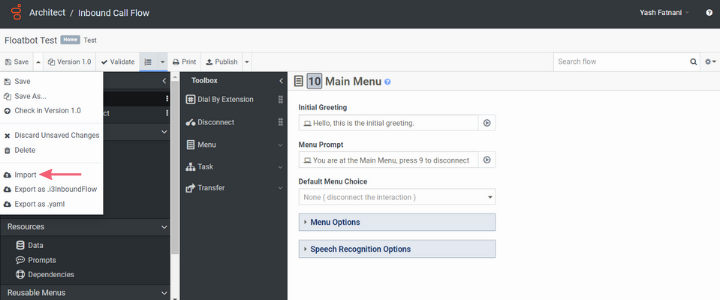
Step 8: Import Floatbot Inbound_v1-0.i3InboundFlow into this Architect
2. Escalate to Agents
Step 1: Download Agents_v1-0.i3InboundFlow from <here>
Step 2: Create a new Architect as shown in the previous section: Floatbot IVA Configuration
(Admin => Architect => Add => Create Flow
Step 3: Import Agents_v1-0.i3InboundFlow into this Architect
Step 4: Click on New Task1 under Starting Task
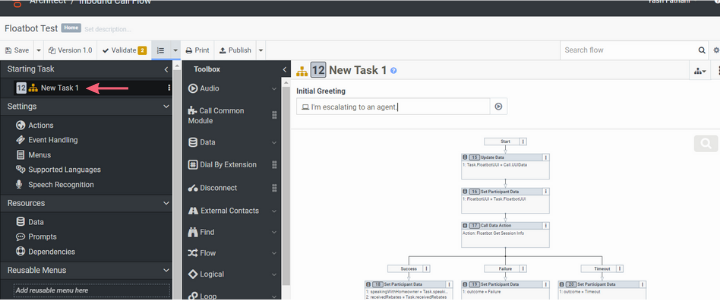
Step 5: Click on Call Data Action from the workflow
Step 6: Fill in your credentials in the given Input Fields as shown below
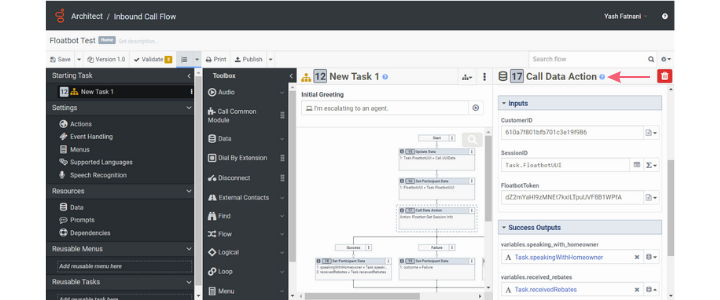
For Customer ID and Floatbot Token,
Go to Bot Builder --> Configure --> Agent Chat Settings --> Turn on Agent chat settings --> Select Genesys --> Select Voice
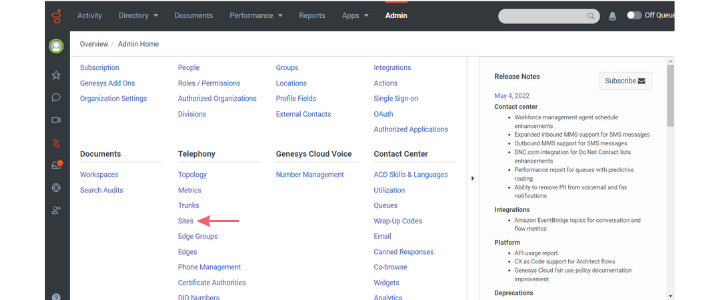
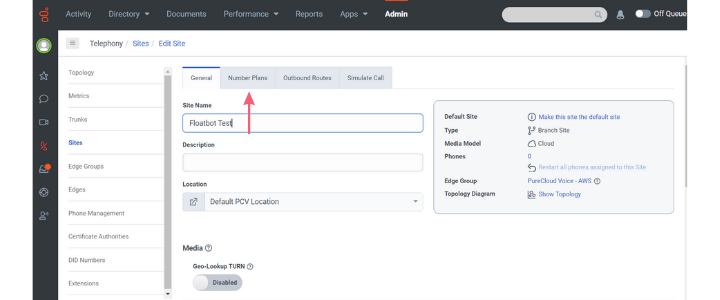
3. Creating Site
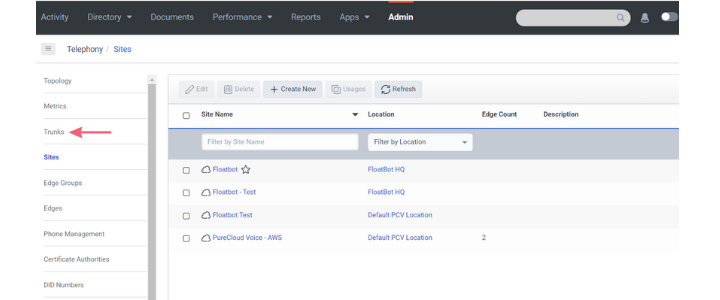
Step 1: Go to Admin
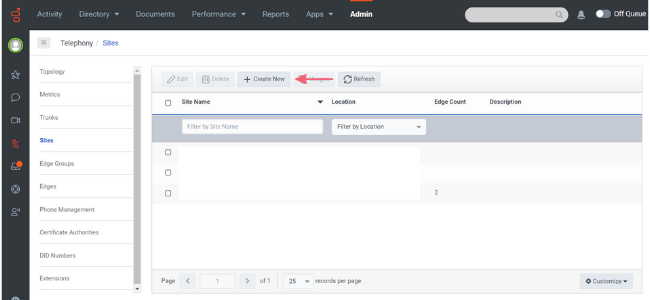
Step 2: Click on Sites from Telephony
Step 3: Click on Create New
Step 4: Fill in the appropriate details
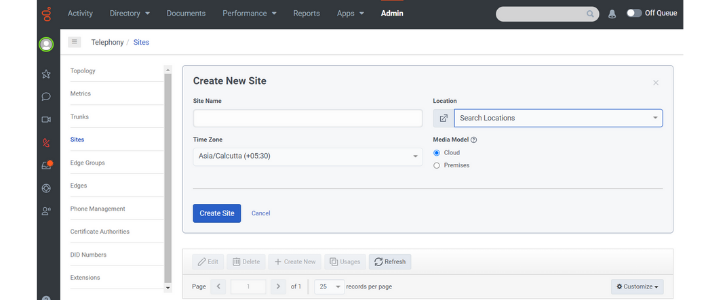
Site Name: Give an appropriate name
Location: Please select your PVC location from the dropdown
Time Zone: Select the appropriate time zone
Media Model: Select the media model
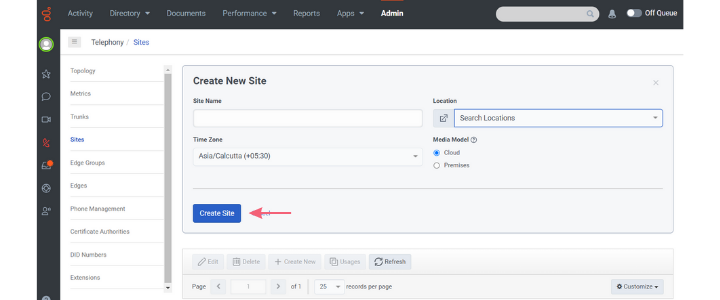
Step 5: Click on Create Site
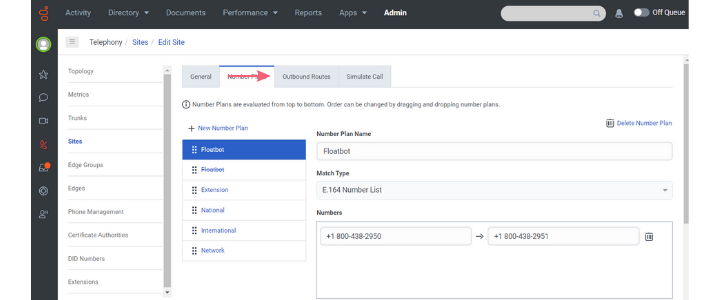
Step 6: Go to the Number Plans tab
Step 7: Click on New Number Plan
Step 8: Fill in the details
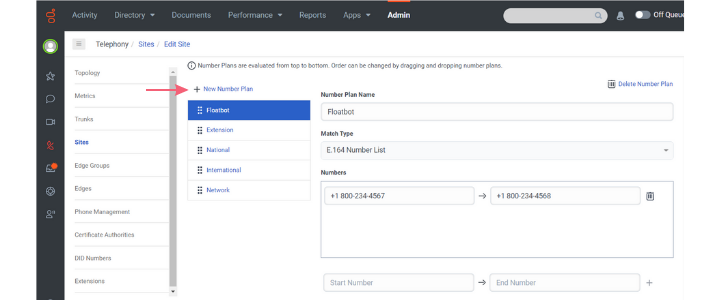
Number Plan Name: Floatbot
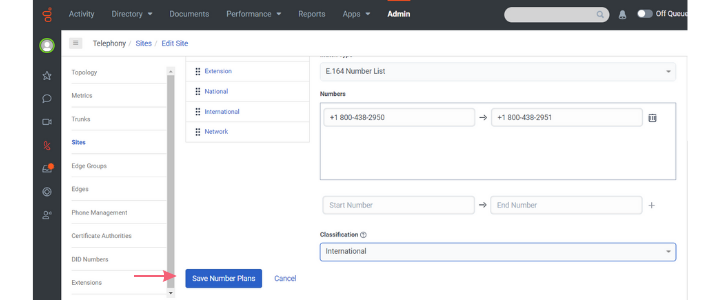
Match Type: E.164 Number List
Start Number and End Number: Get numbers from the floatbot team and click on + to save them. There be two numbers – one to connect with the bot, another to escalate to an agent
Step 9: Click on Save Number Plans
Step 10: Go to the Outbound Routes tab
Step 11: Click on New outbound Route
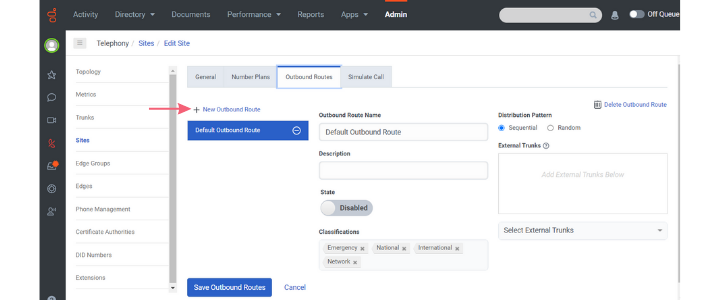
Step 12: Fill in the appropriate details
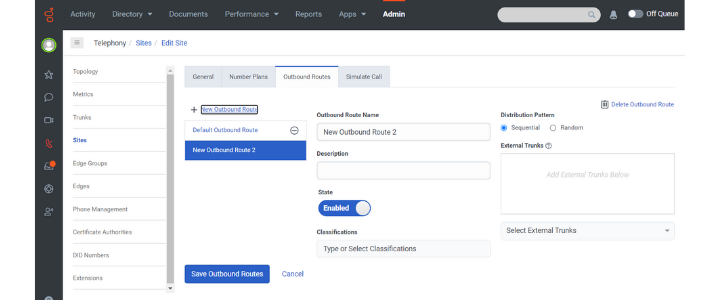
Outbound Route Name: Choose an appropriate name
Description: Give it an appropriate description
State: Enabled
Classification: Select the classification that we created for the new Number Plan
Distribution Pattern:
External Trunk: Select the appropriate Trunk (we will learn how to create a trunk in the next section)
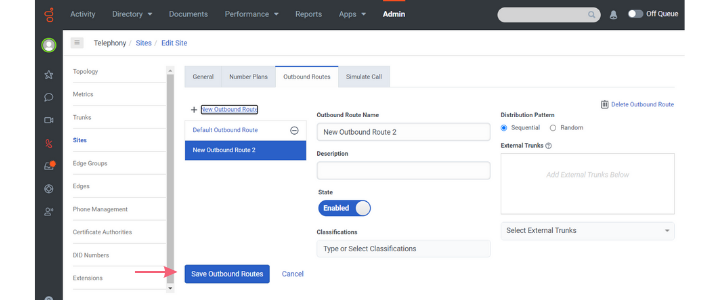
Step 13: Click on the Save Outbound Route button
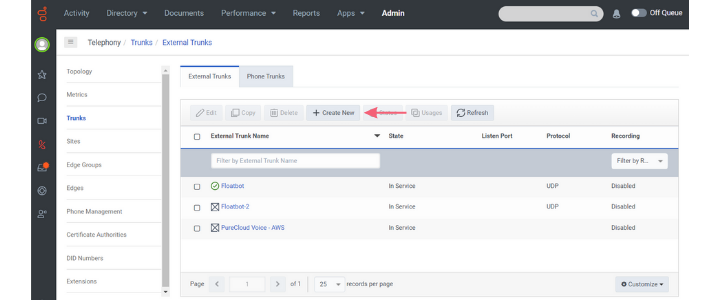
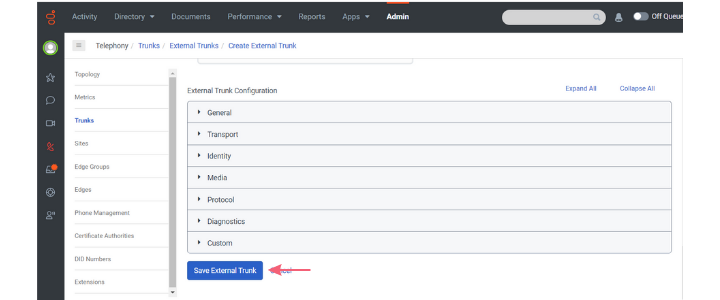
Creating Trunk
Step1: Click on Trunks
Step 2: Click on Create New
Step 3: Fill in the following details
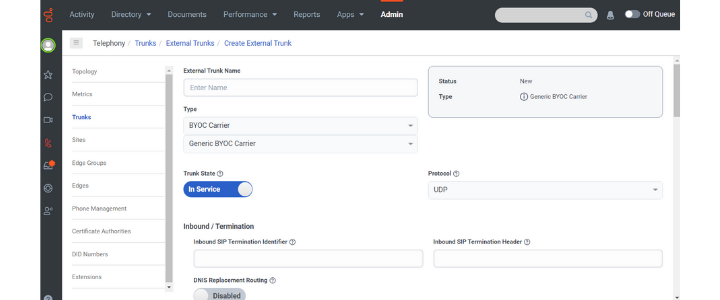
External Trunk Name: Floatbot Trunk
Type: Generic BYOC Carrier
Inbound SIP Termination Identifier: Create a unique identifier, e.g., floatbot.your_organization_name
Scroll Down to SIP Servers or Proxies
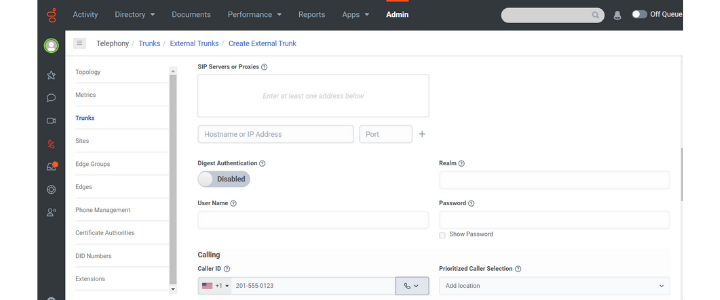
Host Name or IP Address: 152.70.127.52
Port: 5060
Scroll down to SIP Access Control
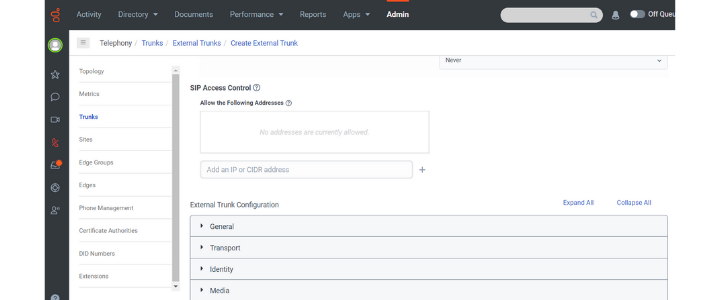
Add the same IP address here -
Step 4: Click on Save External Trunk
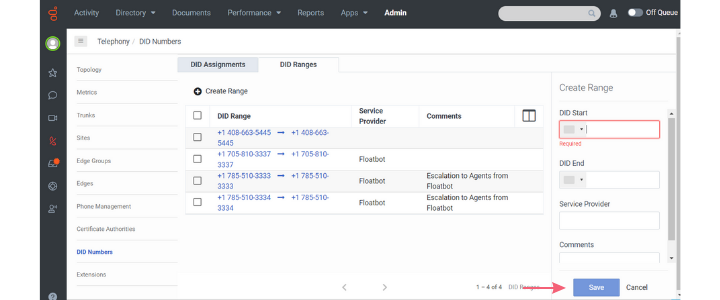
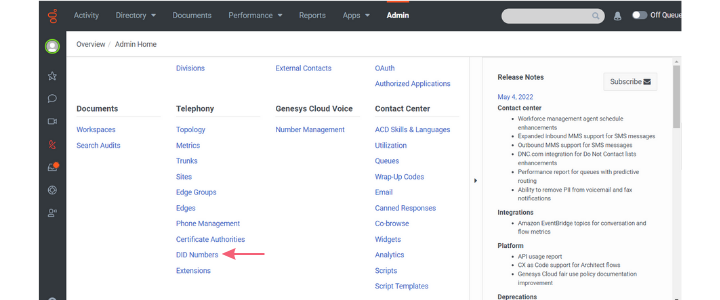
Setting Up DID Numbers
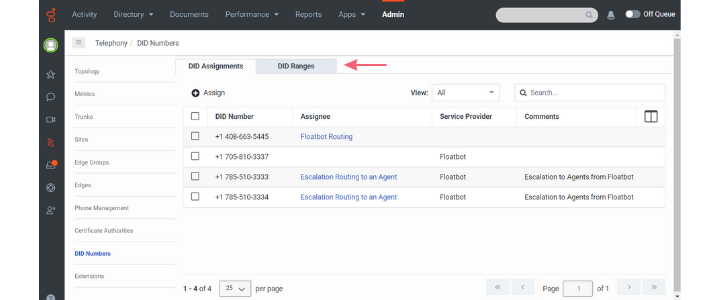
Step 1: Click on DID Numbers under Telephony
Step 2: Go to DID Ranges
Step 3: Click on Create Range
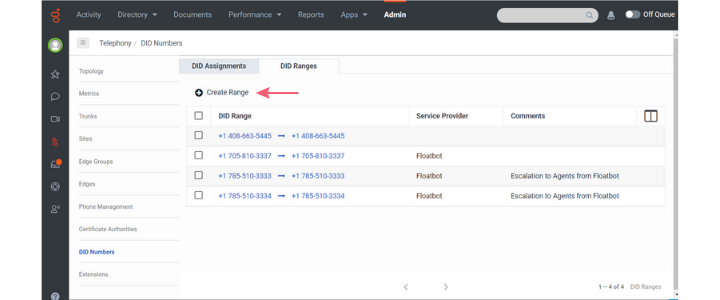
Step 4: Fill up the details in the Create Range fields
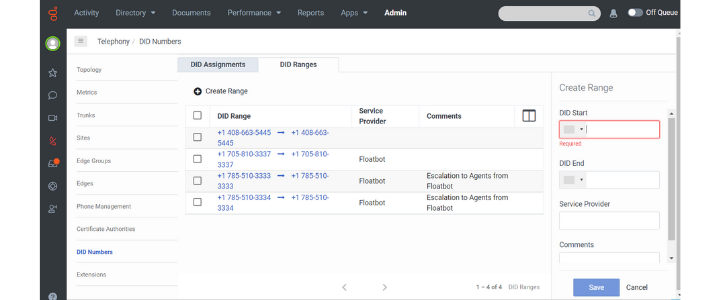
DID Start: Number received from the Floatbot team to connect to the bot
DID End: Number received from the Floatbot team to escalate to an agent
Service Provider: Floatbot
Step 5: Click on the Save button