User Input
This item helps you to get input from the users. Most of the user inputs can have questions like:
- May I know your name?
- Please share your email id.
- Can you please share your contact number?

To set a user input you will have to fill in:
- Question to your user-
Here you will have to fill in the question to get the desired input. As you can see on the above image, “Can I please get your name?” is the question mapped for the user input item. - Validation-
The form in which you desire to get the input. Text, number, Email id etc. Select the correct validation from the dropdown provided. As we are asking for the name from the user, we have used “name” validation. - Attribute-
Set an attribute to save that input. The “name” attribute will store the answer provided by user. If user answers as “the name is John” then the “name” attribute will have value “John”.
Standard Validations
To get input from the user you will have to enter your message and set standard validations. The standard validations are:
- Text: If the answer is expected in the form of text
- Phone: If the answer is expected to be a Phone number
- Email: If the answer is expected to be an Email ID
- Number: If the answer is expected to be a number
- Attachment: If you want to give the option to attach a document in the bot then select the validation as attachment in the user input.
Note: Maximum size allowed to upload the document is 900kb - Custom: You can also customize the validation as per the requirement to get an appropriate response from the user. You can create your Regex and paste it to implement the custom validation.
Custom validation will require more details than the above-mentioned ones. It will require
- Name of the validation
- Regular expression
Custom validation expression is compulsory. To understand custom validation more clearly, watch the video below.
Skip item
Once you’ve received an input from the user and saved it as an attribute. You can skip the attribute if the same input is going to be asked again in your other flows. There two ways in which you can skip the input.
- Skip with no confirmation -
Here the bot with skip the process without confirming the details - Skip with confirmation -
The bot will ask the user a question to confirm if the attribute is correct
AI Execution Pipeline
When you expect a specific input from user and next flow needs to be triggered basis the input from user. For e.g.: If your question is “Am I speaking with John?” and the next question will be basis User response “Yes” or “No”. You can create Intents for Yes and No. (To create Intents, you can refer to Floatbot Intents).
- Each Intent will be mapped to a flow and can help set a value within the assigned Attribute.
- If no Intents are mapped It proceeds with the next Item below the User input within that flow.
Please refer below Video to get a detailed Idea on using Intents.
Spell Correction
Automatically corrects user input to ensure accurate understanding and responses, enhancing the bot's ability to interpret queries correctly.
Enable Masking
The Enable Masking feature secures user-provided data by masking sensitive values, maintaining privacy and data security.
Advance
Under the advance option, you will have to set an error message if the user’s reply is not as per the given requirement.
You can add Intent groups by clicking on the advance option. This function helps you to group Intents and map all of them within an Intents in one go.

Voice Settings
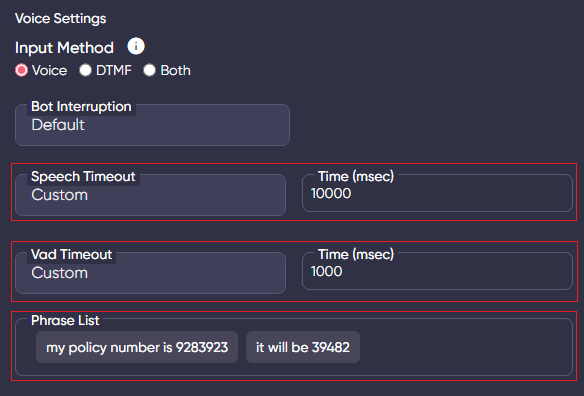
This section helps you to enable multiple functionalities for a User Input when used for a Voicebot. This section includes 3 parts, Input methods, Settings and phrase list.
- Input methods: You can select the input from DTMF or Voice input. If you expect to have both options you can select on “Both” option.
- DTMF option will take inputs as key press.
- Voice option will take inputs using usual voice ASR input.
- When you opt for both, the BOT accepts both DTMF as well as Voice input.
- Settings: Under this section you can choose multiple options and use them as per the requirements.
- BOT interruption: Whenever Voice or DTMF Interruption needs to be enabled you can turn on this option.
- Speech Timeout: You can setup a custom Speech timeout for each Quick reply item. Whenever BOT does not get reply in the expected set time it will fallback and speak the Timeout message.
- VAD timeout: The VAD Timeout configuration allows users to customize the duration of silence after which the system stops listening for further input.
- Phrase list: The Phrase List section allows users to input specific phrases they expect the Automatic Speech Recognition (ASR) system to detect accurately during interactions.

