
You might have heard about new algorithms that help large language models (LLMs) understand preferences better these days. They look promising. But we still need to do supervised fine-tuning (SFT) to make sure the models really get it right and come together successfully.
There's a new algorithm called ORPO (Odds Ratio Preference Optimization) that can help with this. It's innovative because it gets you rid of the need for an extra preference alignment step. With ORPO you align the language model in just one step. You do this by giving a small penalty to responses rejected and big signal to the chosen ones. It is done using a simple math term called log odds ratio added to the loss function.
Here's how traditional fine-tuning usually works
First you have SFT tuning which adapts the model to your specific task.
Then comes Preference Alignment where methods like Reinforcement Learning with Human Feedback (RLHF) or Direct Preference Optimization (DPO) are used to make sure the model generates more preferred responses than rejected ones.
But there's a problem – that is SFT LLM can sometimes make the model generate unwanted answers alongside the preferred ones. That's why Preference Alignment is necessary – it helps make the preferred responses stand out more.
Now, let's talk about ORPO Fine Tuning
ORPO, offers a neat solution to this problem. It combines instruction tuning and preference alignment into one single training process. ORPO tweaks the standard language modeling objective by adding an odds ratio (OR) term to the loss function. This OR loss gently penalizes rejected responses & strongly rewards preferred ones. This means the model can learn your specific task while also getting better at generating preferred responses.
And the best part? ORPO has been integrated into major fine-tuning libraries like TRL, Axolotl & LLaMA-Factory. Studies show that ORPO performs better than other alignment methods across different model sizes and benchmarks.

What are the Steps Involved in Fine Tuning Llama 3 with ORPO?
Fine-tuning Llama 3 with ORPO (Odds Ratio Preference Optimization) involves a series of steps that include setting up the environment, configuring the model, loading & preprocessing data, training the model, evaluating its performance and finally deploying the model. This guide provides a comprehensive walkthrough of these steps.
Step 1: Setup
You should begin by importing essential libraries like Transformers, Accelerate, and Weights and Biases (W&B). The Transformers library gives you access to pre-trained language models and tools for fine-tuning.
The Accelerate library is useful for optimizing training performance especially on GPU architectures. With W&B, you can log & visualize model performance during training.
Step 2: Configuration
First, decide how many GPUs you'll use for training and optimize memory usage accordingly.
Set up logging to monitor training progress & performance metrics using tools like W&B. Select the appropriate pre-trained model like Llama 3 based on your task & dataset characteristics.
Decide the quantization techniques to optimize model inference speed and memory footprint. Configure attention mechanisms such as self-attention or cross-attention layers based on the specific requirements of your task.
Step 3: Data Loading
You start by loading the fine-tuning dataset which contains prompt-response pairs labeled as chosen or rejected tailored for ORPO.
Make sure the dataset is correctly formatted and organized for easy loading and processing during training.
To efficiently load & iterate over the dataset during training you can use data loaders provided by libraries like PyTorch or TensorFlow.
Step 4: Data Preprocessing
First, you preprocess the dataset by tasks like tokenization, normalization and encoding. This gets the data ready for training.
Next, you filter & select a subset of data for training. Consider factors like relevance to your task and diversity of examples.
Lastly, you handle any missing or noisy data by using appropriate cleaning techniques. This ensures the quality of your training data.
Step 5: Model Setup
Use the Transformers library to load the Llama 3 model & tokenizer with pre-trained settings. Prepare the model for fine-tuning. Decide which layers to keep fixed and which to allow changing. Adjust the learning rate and batch size for training efficiency.
Fine-tuning might require tweaking parameters like the learning rate scheduler, optimizer (e.g. - Adam) & gradient clipping to fit your data and task.
Experiment with these settings until you find the best fit for your needs.
Step 6: Training
Make sure to use the ORPO technique while fine-tuning to improve the odds ratios between selected & rejected responses directly. Then train the model using the dataset and specified parameters. Keep track of training progress and performance metrics.
Finally, use methods like early stopping &checkpointing to prevent overfitting and save the best model checkpoint.
Step 7: Model Evaluation
Once you've finished fine-tuning it's time to see how well your model does with validation or test datasets. You'll want to examine metrics such as accuracy, precision, recall and F1 score.
Take a moment to compare this performance with your previous models to gauge any improvements. If your fine-tuned model hits the mark, go ahead and save it.
Step 8: Adaptation and Merging
To make your model better at understanding different things, try giving it more data or tweaking it for similar tasks. Look into methods like model distillation to share what it learned with smaller models.
You can also merge the fine-tuned model with the base one or mix it with other models to see if it improves.
Step 9: Deployment
Put your fine-tuned model to work in different NLP tasks like chatbots, sentiment analysis, or text generation. Make it easy to use by bundling it with all the stuff it needs and set it up for cloud platforms, edge devices or containers.
Share the fine-tuned model with the community by uploading it to model repositories like Hugging Face’s model hub if you want to.
Here is the Step-by-Step Process of How You can Fine Tune Llama 3 with ORPO:
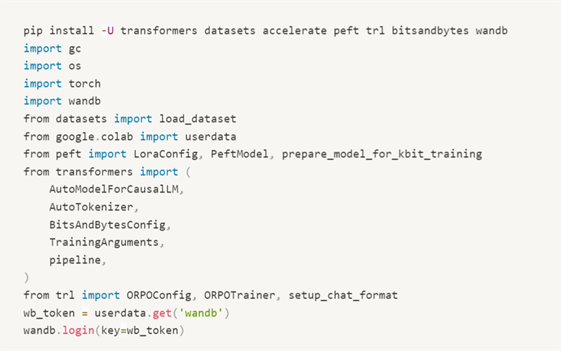
1. Install Required Libraries:
Install the necessary libraries using pip. The libraries include transformers, datasets, accelerate, peft, trl, bitsandbytes & wandb. Import the necessary libraries and log in to Weights & Biases (optional).
2. Check GPU Capability
If you have a recent GPU, you can use the Flash Attention library to replace the default eager attention implementation with a more efficient one.
3. Load the Llama 3 8B Model:
Load the Llama 3 8B model in 4-bit precision. Set the LoRA configuration using PEFT for QLoRA. Use the setup_chat_format() function to modify the model and tokenizer for ChatML support.

4. Prepare Dataset:
Load the mlabonne/orpo-dpo-mix-40k dataset and use the apply_chat_template() function to convert the “chosen” and “rejected” columns into the ChatML format. Note that only 1,000 samples are used and not the entire dataset.

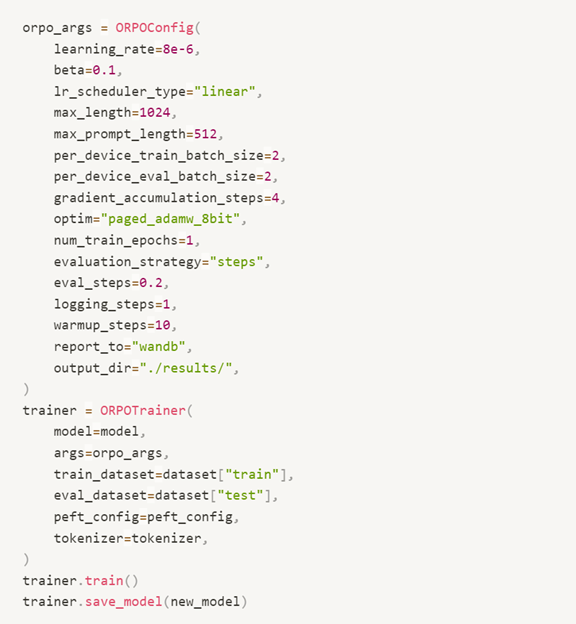
5. Set Hyperparameters:
Set a few hyperparameters such as learning rate, beta, max_length, batch size, etc
6. Train the Model:
Train the model using the ORPOTrainer, which acts as a wrapper.
7. Save the Model:
Save the trained model.
8. Merge QLoRA Adapter with Base Model:
After training, merge the QLoRA adapter with the base model.
9. Push Model to Hugging Face Hub:
Push the model and tokenizer to the Hugging Face Hub.
When you quickly fine-tune Llama 3 keep in mind that the model is undertrained. For better results, try fine-tuning it on the entire 40,000 samples. The final model shows promising results and demonstrates ORPO's potential as a new fine-tuning approach. You can experiment with the model using a Hugging Face Space.
It is worth noting that the model improves the base model's performance across all benchmarks. Meaning - fine-tuning on the entire 40,000 samples would get you really good results.
Floatbot.AI
Leverage Floatbot’s GenAI-powered conversational AI solutions. Easily build enterprise-grade chatbots, voicebots, text/SMS bots with our no code/low code platform. Augment your human agents’ productivity with Real-time AI Agent Assist bots. With us:
- Automate & optimize your workflows & operations with AI Agents or Agentic AI.
- Launch self-serving bots for your Customers without any need for human intervention
- Increase human agent Productivity by up to 50%
- Reduce AHT by 25% to 30%
- Increase CSAT Score by 80%
- Get a Boost in Customer issue Resolution Rate by 70%
- Enhance CX by 85%
- Improve First-time Right resolutions by 60%
And more.


